In graphic design for pet-related projects, bleed refers to the area that extends beyond the final trim size to ensure images or colors run to the edge without white borders. Margin is the safe zone inside the design where important elements like text and logos should be placed to prevent them from being cut off during trimming. Understanding the difference between bleed and margin is crucial for creating professional and visually appealing pet-themed print materials.
Table of Comparison
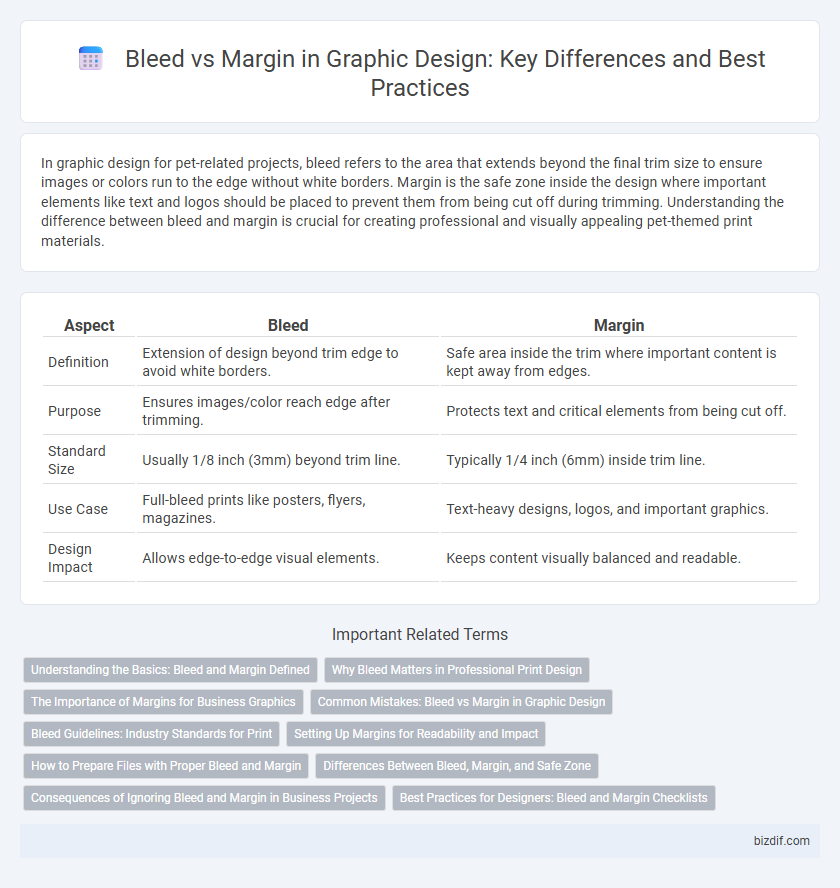
| Aspect | Bleed | Margin |
|---|---|---|
| Definition | Extension of design beyond trim edge to avoid white borders. | Safe area inside the trim where important content is kept away from edges. |
| Purpose | Ensures images/color reach edge after trimming. | Protects text and critical elements from being cut off. |
| Standard Size | Usually 1/8 inch (3mm) beyond trim line. | Typically 1/4 inch (6mm) inside trim line. |
| Use Case | Full-bleed prints like posters, flyers, magazines. | Text-heavy designs, logos, and important graphics. |
| Design Impact | Allows edge-to-edge visual elements. | Keeps content visually balanced and readable. |
Understanding the Basics: Bleed and Margin Defined
Bleed refers to the area extending beyond the final trim edge of a design to ensure that colors or images reach the edge of the printed material without white borders. Margins are the safe zones inside the trim line, keeping important content like text and logos away from edges to prevent accidental cropping. Properly setting bleed and margin values in design software like Adobe InDesign or Illustrator is crucial for professional print accuracy and visual integrity.
Why Bleed Matters in Professional Print Design
Bleed ensures that background colors and images extend beyond the trim edge, preventing unsightly white borders after cutting in professional print design. Margins maintain safe zones for important content, but without proper bleed, trimming inaccuracies can ruin the final appearance. Proper bleed settings uphold design integrity and guarantee polished, high-quality printed materials.
The Importance of Margins for Business Graphics
Margins in business graphics ensure essential content remains visible by preventing critical elements from being cut off during printing or display. Maintaining proper margins enhances the professional appearance of marketing materials and improves readability, directly impacting brand perception and customer engagement. Clear margin usage supports consistent layout structure, making designs adaptable across various platforms and formats.
Common Mistakes: Bleed vs Margin in Graphic Design
Common mistakes in graphic design often arise from confusing bleed and margin settings, leading to crucial elements being cut off or too close to the edge. Bleed extends the artwork beyond the final trim size, usually by 0.125 inches, ensuring no white edges after trimming, while margins act as safe zones inside the trim line to prevent important content from being trimmed. Ignoring proper bleed setup or placing vital text within the bleed area instead of the margin results in poor print quality and layout problems.
Bleed Guidelines: Industry Standards for Print
Bleed guidelines in graphic design require extending artwork beyond the final trim size, usually by 1/8 inch (3mm), to prevent white edges during printing and trimming. Industry standards mandate maintaining this bleed area to ensure full-bleed prints without undesired borders, especially for brochures, posters, and business cards. Designers must set up bleed in design software like Adobe Illustrator or InDesign to align with print shop specifications and achieve accurate, professional output.
Setting Up Margins for Readability and Impact
Setting up margins in graphic design is essential for readability and visual impact, providing clear space around the content to prevent text and images from feeling cramped. Margins create a buffer zone that guides the viewer's eye and enhances overall composition, ensuring important elements are not cut off during printing. Properly defined margins complement bleed areas, balancing design aesthetics with functional space for trimming.
How to Prepare Files with Proper Bleed and Margin
Preparing design files with proper bleed and margin ensures that printed materials maintain visual integrity without unwanted white edges or cut-off content. Set the bleed area typically at 0.125 inches (3mm) beyond the trim line to allow for slight trimming variations, while keeping all critical text and elements within the margin, usually 0.25 inches (6mm) inside the trim line to prevent accidental cropping. Export files in high-resolution formats like PDF/X with bleed settings enabled to provide print vendors with precise crop marks and accurate bleed for flawless final output.
Differences Between Bleed, Margin, and Safe Zone
Bleed refers to the area beyond the trim edge where artwork extends to ensure no white borders appear after trimming, typically 0.125 inches in print design. Margin is the space inside the trim line that keeps important content away from the edges to prevent it from being cut off or obscured, usually set at least 0.25 inches inward. The safe zone lies within the margin and designates the maximum boundary where all critical text and images should be placed for optimal visibility across various printing and cutting processes.
Consequences of Ignoring Bleed and Margin in Business Projects
Ignoring bleed and margin settings in graphic design can lead to critical visual errors such as content being cut off during trimming or important information positioned too close to the edge, reducing legibility. These mistakes compromise the professional appearance of business materials, causing brand reputation damage and ineffective communication. Proper bleed and margin application ensures print accuracy, protects design integrity, and enhances overall project success.
Best Practices for Designers: Bleed and Margin Checklists
Designers should ensure the bleed extends at least 0.125 inches beyond the trim edge to prevent white borders after trimming. Margins must maintain a safe distance, typically 0.25 inches inside the trim line, to avoid cutting off important design elements or text. Regularly checking both bleed and margin using design software guides and pre-flight tools enhances print accuracy and professional output quality.
Bleed vs Margin Infographic